To create a new table, double-click "Tables" in the list view.
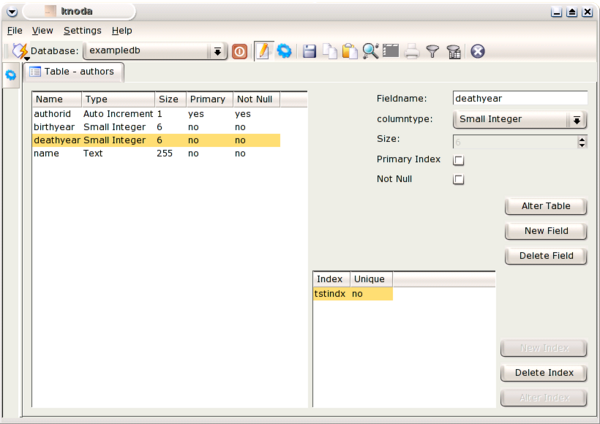
We will now create the "authors" table. A tabledesign dialog will be displayed. As we define fields (columns), they will be listed in the box on the left hand side. It should be empty at this point. To create a column, press the "New Field" button. You will then be presented with default values in "Fieldname", "Fieldtype", "Size", "Primary Index" and "NOT NULL" fields. You should change the default values to describe the column you want to create.
Now define the columns for the "authors" table, using the values shown in the tabledesign window in Figure 4.1, “The tabledesign window”
To alter a definition of a column, select it in the left hand side list box and alter the values displayed in the upper right fields.
Important
Always define a unique / primary index in each table, otherwise you will experience some ugly side-effects when updating your data! The most convenient way to create a unique primary index is to use the "Auto Increment" field.
The following fieldtypes are valid:
text: fixed length (usually defined in SQL as CHAR(size))
auto_inc: if the databasedriver supports this fieldtype then it will get a unique number automatically whenever a new row is be added. This is typically a readonly column
small integer: an integer in the range -32768 to 32767
integer: an integer with the maximum range the database server can handle
small float: a small (single-precision) floating point field. Allowable values in MySQL are '-3.402823466E+38' to '-1.175494351E-38', '0', and '1.175494351E-38' to '3.402823466E+38'.
float: a normal-size (double-precision) floating point field with the maximum range the database server can handle. Allowable values in MySQL are '-1.7976931348623157E+308' to '-2.2250738585072014E-308', '0', and '2.2250738585072014E-308' to '1.7976931348623157E+308'.
date: a date field to store days, months and years
datetime: a date and time field to store days, months, years, hours, minutes and seconds.
timestamp: a date and time field to store days, months, years, hours, minutes and seconds. On some SQL servers the value will be automatically set and is read-only
time: a time field to store hours, minutes and seconds.
binary: a binary field to store data of more or less any size.
memo: a text field to store data of more or less any size.
bool: a field that is either 'true' or 'false'
There are two buttons in the upper left hand corner known as the "View Mode" buttons. The left hand button is the "Design" button, which should already be pressed, and the right hand one is the "Table Data" button. When you have completed your data-input, press the right button ("Table Data" button) at the top of the window.
Important
All high level widgets like tables, queries and forms operate in two modes, a design mode and a view mode. At the top of each window is a horizontal toolbar with at least two buttons. The left button selects the design mode and the right button the view mode.

After pressing the "Table Data" button, you will be asked if you want to alter the table. Confirm this question with the 'OK' button. The next dialog will prompt you for the name of the new table to which you enter "authors" and confirm by pressing the 'OK' button.
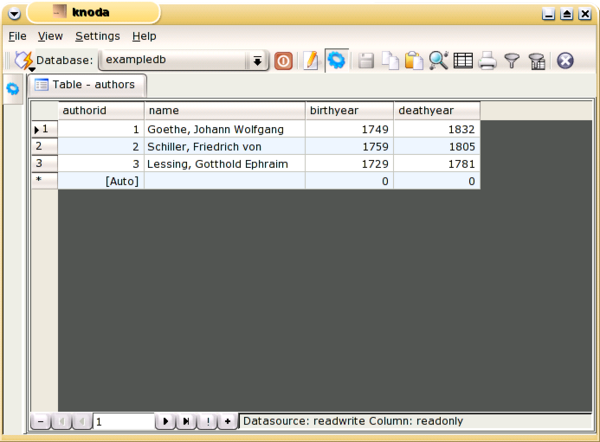
After that an empty grid is shown where you can interactively enter the data for each row. Start to enter the data in the row with the arrow. After the input of the first row, the last row will begin with a "*" and is empty. This is a new row where you can enter new data.
Enter the values for the first three rows as shown in the example. You will note that the vaules for the Auto Increment field "author_id" will be automatically generated.
Important
The bottom left hand corner of the table data window contains seven buttons and a field. These are the row selector buttons. The arrow buttons allow you to navigate between rows. The extreme left button (the '-' button) deletes the selected row. The button with the check mark on the right stores the changes made and you can add a new row by using the '+' button on the extreme right.

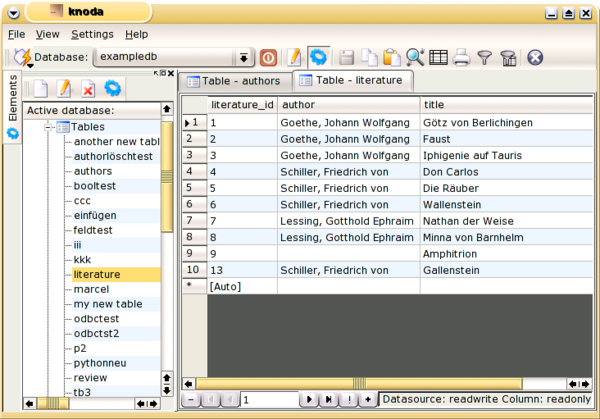
Now you can create the second table, "literature", on your own. Enter the first eight rows manually. As you can see, it is difficult to ensure that the manually input value in the field "author" of the "literature" table has an equivalent value in "authors" table.
The next figure shows how your "literature" table should look.
Important
You can print the table contents with the print button.


